AWS Chatwoot deployment guide
The following is a reference HA architecture guide for deploying Chatwoot on AWS. For a cloud-native deployment, use our helm charts with AWS Elastic Kubernetes Service(EKS).
Introduction
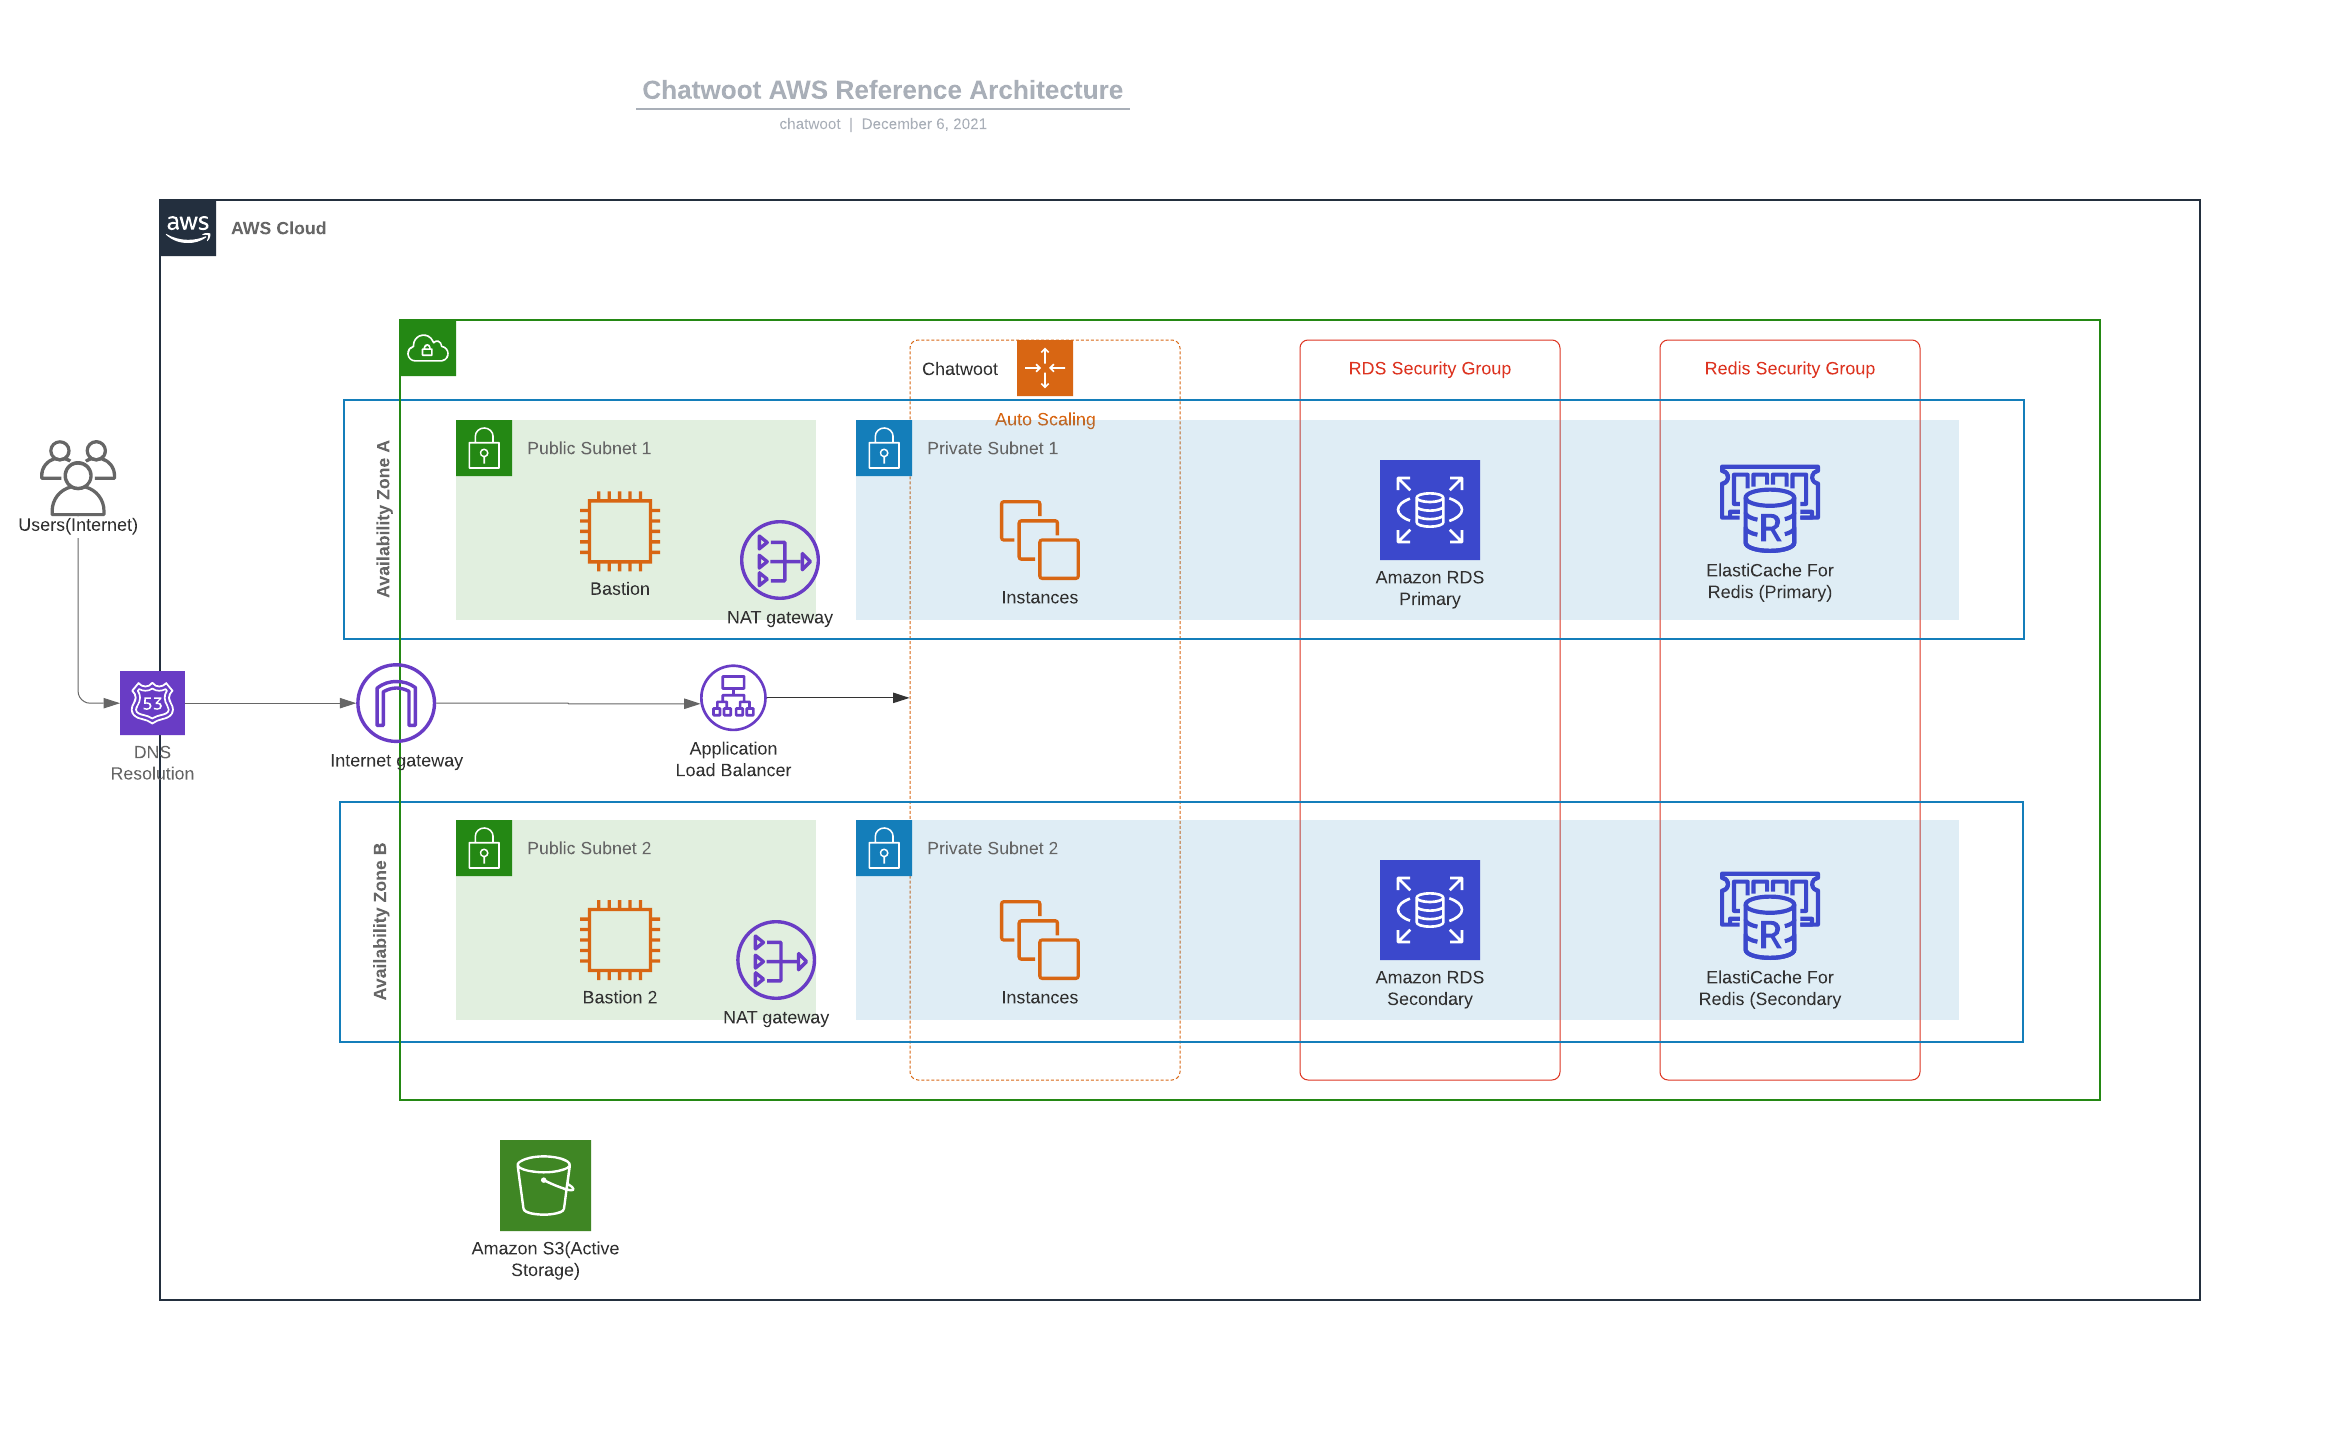
We will use the Linux installation script to get a chatwoot instance running. Also instead of relying on Redis, Postgres and Nginx installed in the same ec2; we will proceed to make use of managed AWS services for the same viz Elasticache, RDS, and ALB.
Prerequisites
- AWS account
- Domain to use with Chatwoot
Architecture
This guide will follow a standard 3-tier architecture on AWS.
Network
Create VPC
- Sign in to the AWS console and pick the region you will deploy.
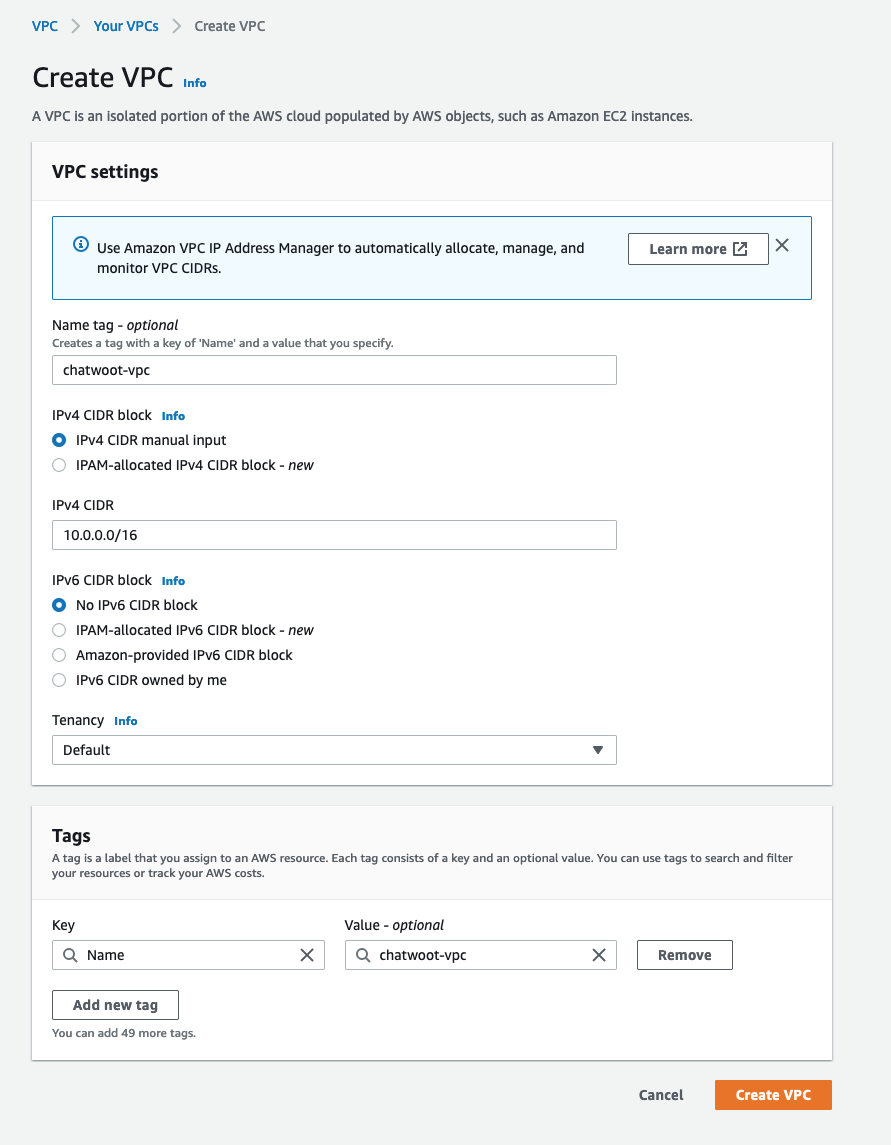
- Navigate to the VPC console and create a new vpc for chatwoot. At the
nametag, enterchatwoot-vpcand use the CIDR block10.0.0.0/16. - Leave the rest of the options as default and click on
Create VPC.
Subnets
Create two public and private subnets in the vpc we created. Make sure to have them in different AZ's and have non-overlapping CIDR ranges.
-
Navigate to VPC > Subnets.
-
Click on
Create Subnet. Select thechatwoot-vpcwe created before, name it aschatwoot-public-1, select an availability zone (for example, ap-south-1a), and the CIDR block as10.0.0.0/24.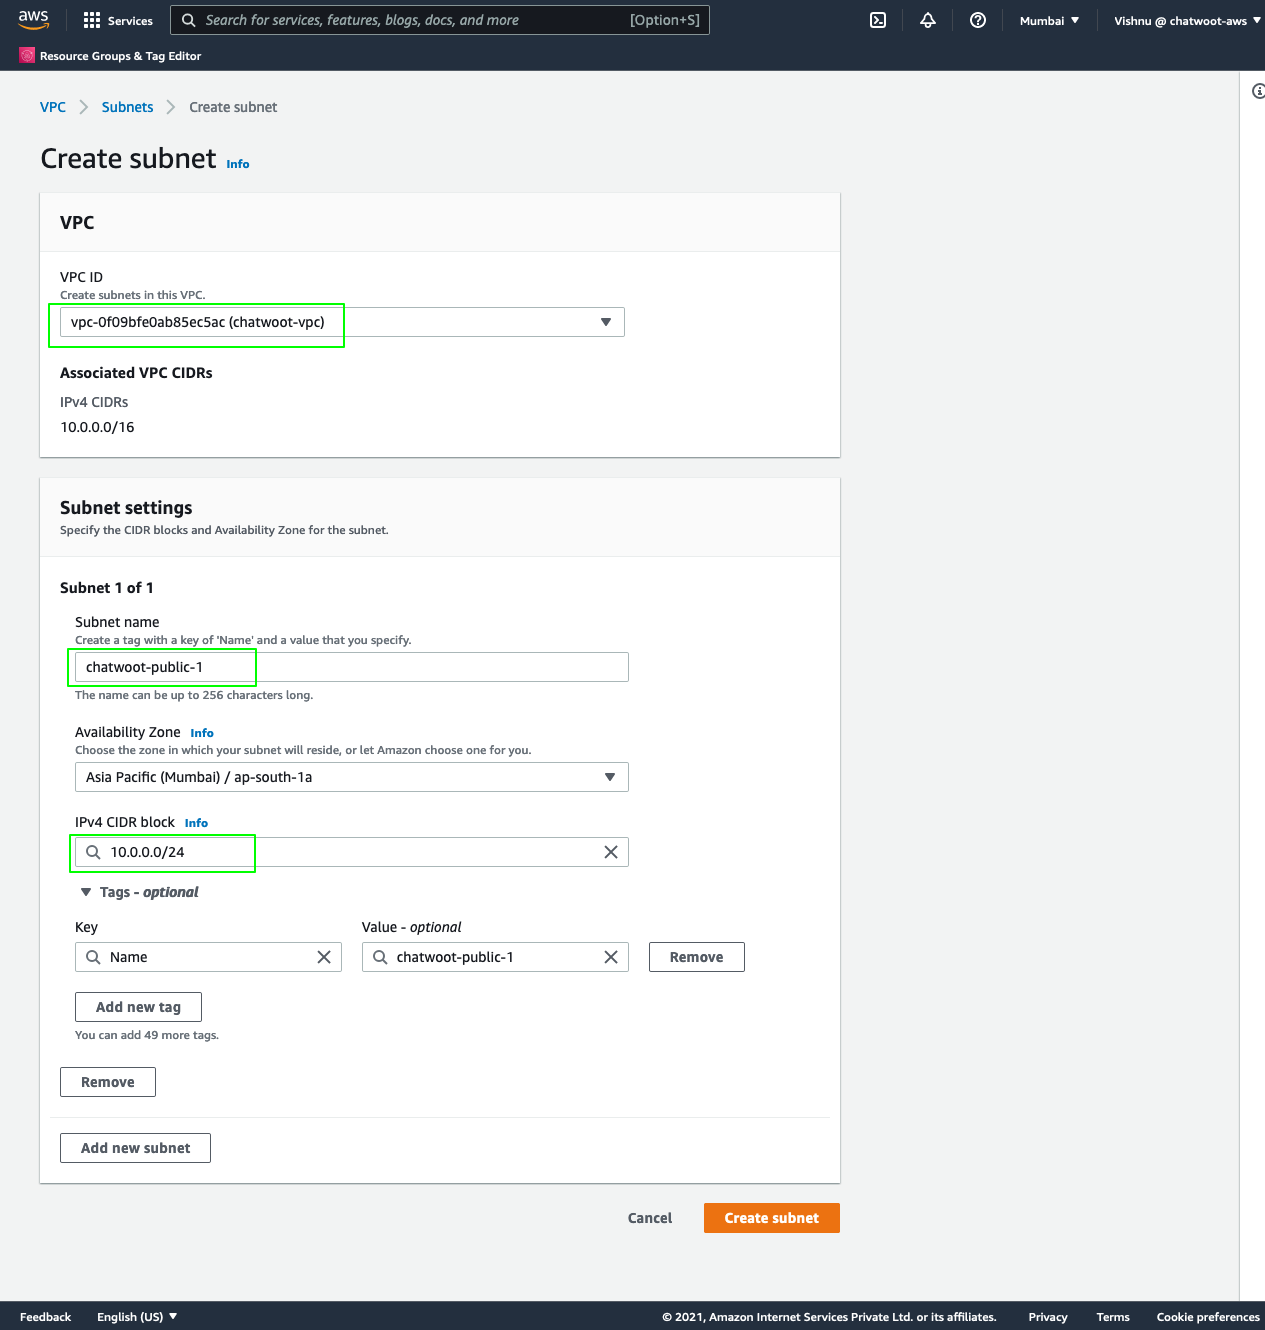
-
Follow the same to create the remaining subnets.
| Name | Type | Availability Zone | CIDR Block |
|---|---|---|---|
chatwoot-public-1 | public | ap-south-1a | 10.0.0.0/24 |
chatwoot-public-2 | public | ap-south-1b | 10.0.1.0/24 |
chatwoot-private-1 | private | ap-south-1a | 10.0.2.0/24 |
chatwoot-private-2 | private | ap-south-1b | 10.0.3.0/24 |
- After creating all subnets, enable
auto assign public ipv4 addressfor public subnets underActions>Subnet Settings.
Internet Gateway
- Select
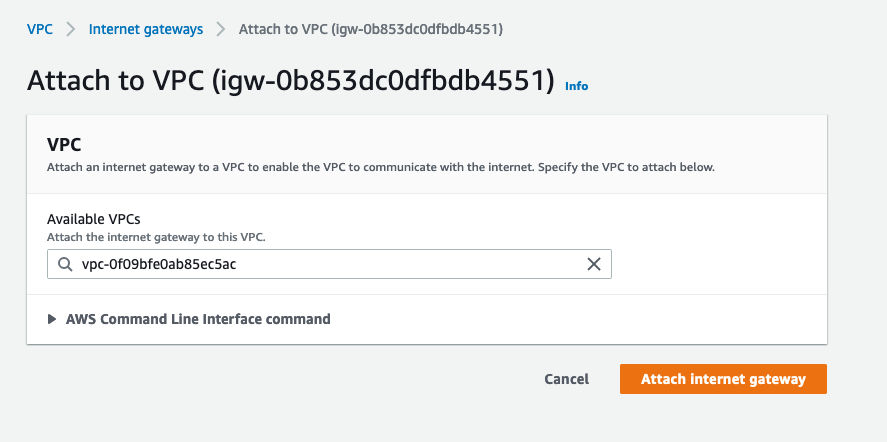
Create Internet Gateway, name itchatwoot-igw, and click create. - Select it from the internet gateways list, choose actions and then select
Attach to VPC. - Choose
chatwoot-vpcand click attach.
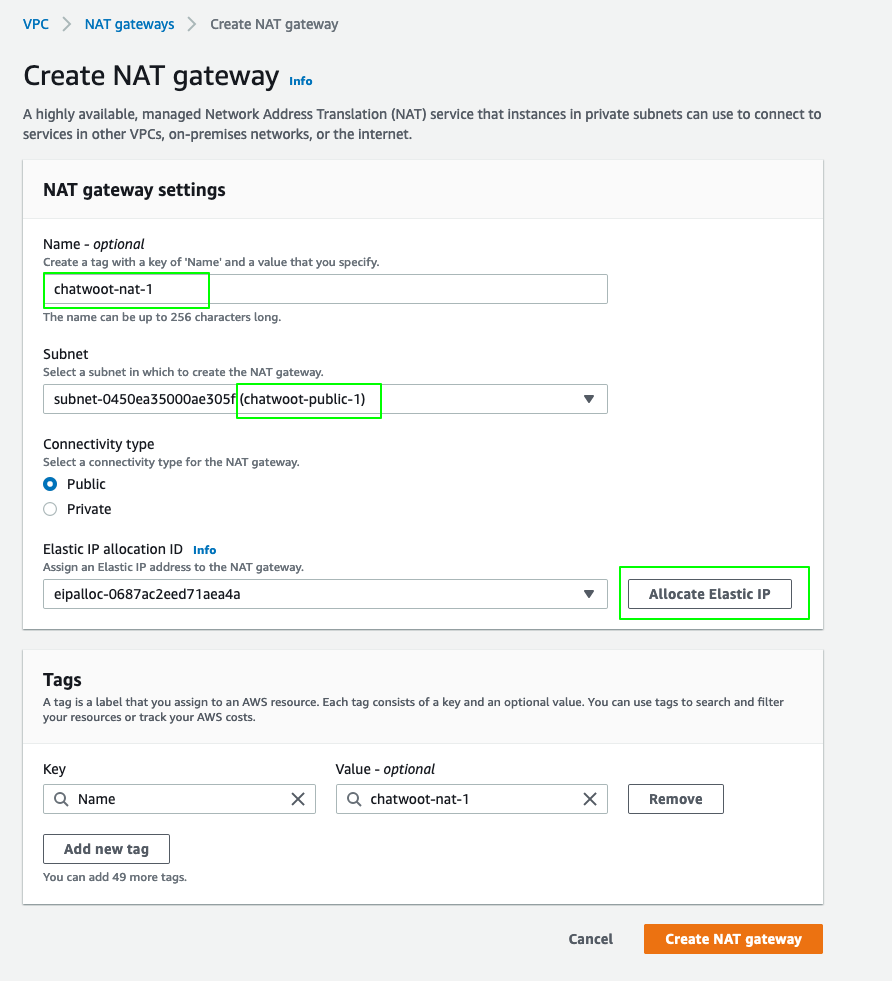
NAT Gateway
Chatwoot app servers need to be deployed in the private subnet. For them to access the internet, we need to add NAT gateways to our public subnet and add a route from the private subnets.
-
Navigate the VPC dashboard and select
NAT gateways. -
Click
Create NAT Gateway.- Name it
chatwoot-nat-1. - Select the
chatwoot-public-1subnet. - Click on
Allocate Elastic IP. - Add additional tags as per your need.
- Click
Create NAT gateway.
- Name it
- Follow the same to create a second NAT gateway (
chatwoot-nat-2) and choose thechatwoot-public-2subnet.
Route tables
The route table controls the inbound and outbound access for a subnet.
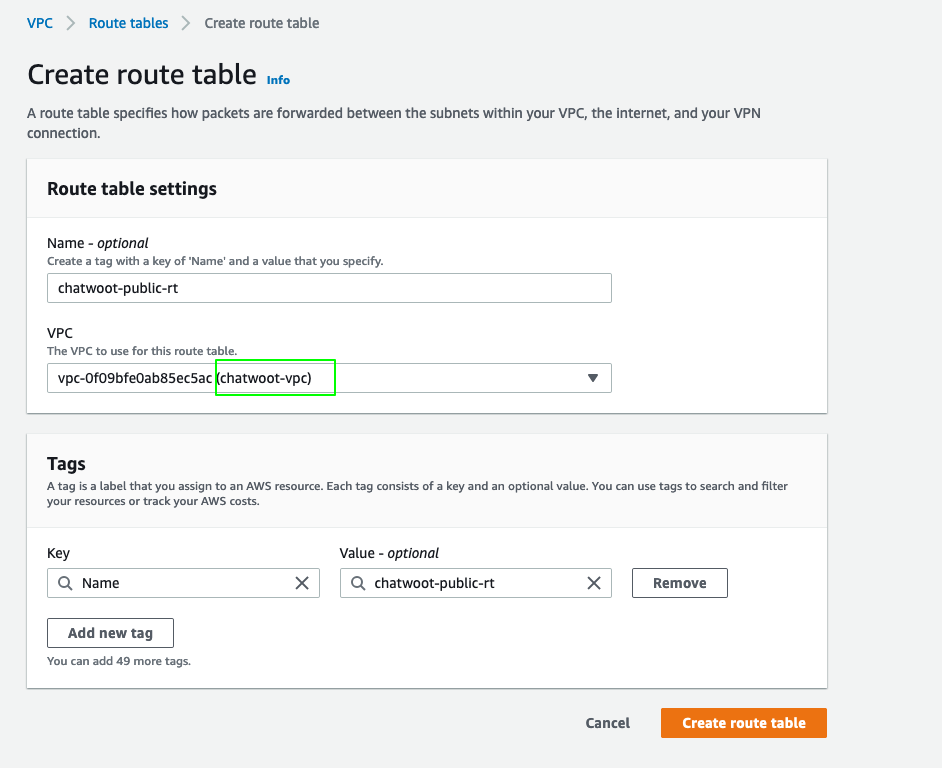
Public Route table
We will create route tables so that our public subnets can reach the internet via the Internet gateway.
Navigate to the VPC dashboard and select Route Tables.
- Click
Create route table. - Use the name
chatwoot-public-rtand choosechatwoot-vpcunder VPC. - Click
Create.
Next, we need to add a route to the internet gateway we created earlier(chatwoot-igw).
- Select the
chatwoot-public-rtroute table from the list and click onEdit routes>Add Route. - Set the destination as
0.0.0.0/0and choose the target aschatwoot-igw. Click onSave Changes.
Also,
- Select the
chatwoot-public-rtroute table from the list and click onSubnet Associations>Edit subnet associations. - Select both the public subnets(
chatwoot-public-1,chatwoot-public-2) and clicksave.
Private Route table
We will also create private route tables so that our private subnets can reach the internet via the NAT gateways.
- Follow the above guide and create two private route tables, namely,
chatwoot-private-aandchatwoot-private-b. - Select the route tables and add a route to the NAT gateway in their respective availability zone.
- For
chatwoot-private-a, add a route to0.0.0.0/0and target aschatwoot-nat-1. - For
chatwoot-private-b, add a route to0.0.0.0/0and target aschatwoot-nat-2.
- For
Also,
- Associate the private route tables with corresponding private subnets.
- For
chatwoot-private-a, associatechatwoot-private-1subnet. - For
chatwoot-private-b, associatechatwoot-private-2subnet.
- For
Application Load Balancer (ALB)
Create an application load balancer to receive traffic on port 80 and 443 and distribute it across Chatwoot instances.
- Navigate to the EC2 section and choose the Load Balancer section.
- Click
Create Load Balancer.- Choose
Application Load Balancer. - For the load balancer name, use
chatwoot-loadbalancer. - Select the scheme as
internet-facingand IP address type asIPv4. - For the network mapping section,
- Select
chatwoot-vpc. - Select the public subnets
chatwoot-public-1andchatwoot-public-2under the mapping section.
- Select
- For the Security group section,
- Create a new security group,
chatwoot-loadbalancer-sg. - Add rules to allow HTTP and HTTPS traffic from anywhere(
0.0.0.0/0,::/0). - Also, add a rule to allow TCP on port 3000. This rule allows the load balancer health checks to pass since Chatwoot runs on port 3000.
- Add a rule to allow SSH traffic from the bastion security group we will create at the latter stage of the guide. Revisit this section after completing the bastion step.
- Create a new security group,
- For the Listeners and routing section, create two listeners for 80 and 443. Set the forwarding rule on listener 80 to redirect
httptohttps.- Also, create a target group,
chatwoot-tg, that will forward the requests to port3000(Chatwoot listens on this port). - Add a health check to the endpoint
/api. This endpoint is not authenticated and should return the application version.
- Also, create a target group,
- Choose
{
  "version": "1.22.1",
  "timestamp": "2021-12-06 16:07:39"
}
- Add any necessary tags and click create.
Also, add if you have your domain on Route53 and use ACM to generate a certificate to use with ALB.
Postgresql using AWS RDS
Chatwoot uses Postgres as a DB layer, and we will use Amazon RDS with a multi-AZ option for reliability.
RDS security group
- Navigate to EC2 > Security groups and create a new sg.
- Name it
chatwoot-rds-sg. - Select the
chatwoot-vpcand add an inbound rule for postgres port with sourcechatwoot-loadbalancer-sg.
RDS subnet group
- Navigate to the RDS section and select subnet groups.
- Create
chatwoot-rds-groupand choosechatwoot-vpc. - Select both az's and the private subnets.
RDS
- Select create a database.
- Use standard create and choose the Postgres engine.
- Use the production template, and create a Postgres master username and password.
- Enable Multi-AZ deployment.
- Select
chatwoot-vpcand select the rds security group we created earlier. - Enable password authentication.
- Click create.
- After completing the creation, note down the hostname, username, and password. We will need this to configure Chatwoot.
Redis using AWS Elasticache
- Follow similar steps like the rds to create Redis security and subnet groups.
- Create the Redis cluster with a multi-AZ option.
Creating Bastion servers
Create bastion servers in both public subnets. These servers will be used to ssh into Chatwoot servers in private subnets.
- Navigate to the EC2 dashboard and click launch instance.
- Use an
Ubuntu 20.04 imagewith at3.microtype. - Choose
chatwoot-vpcand subnetchatwoot-public-1. - Name it
chatwoot-bastion-a. - Add a new sg,
chatwoot-bastion-sgand enable ssh access from anywhere. - Leave the rest as defaults and click launch.
- Once the instance is up, try to SSH into the instance.
Repeat and create another bastion, chatwoot-bastion-b in the other AZ.
Install Chatwoot
- Navigate to the EC2 section, and click on launch instance.
- Use an
Ubuntu 20.04 imagewith ac5.xlargeinstance type. - Choose the chatwoot-vpc and select the private subnet
chatwoot-private-1. - Disable auto-assign public IP and increase the storage of root volume to 60 GB.
- Add necessary tags. Set the
Nametag tochatwoot. - Select the load balancer security group and click launch.
- SSH into the bastion server and, from there, ssh to the chatwoot instance we created.
- Switch to the
rootuser. - Download the chatwoot Linux installation script.
wget https://get.chatwoot.app/linux/install.sh
chmod 755 install.sh
- Run the script.
./install.sh --install
Configure Chatwoot
- Once the installation is complete, switch to the chatwoot user and navigate to the chatwoot folder. Edit the .env file and replace the Postgres and Redis credentials with RDS and elasticache values.
sudo -i -u chatwoot
cd chatwoot
vi .env
- Run the db migration.
RAILS_ENV=production bundle exec rake db:prepare
-
Also modify the other necessary environment variable for your chatwoot setup. Refer to https://www.chatwoot.com/docs/self-hosted/deployment/linux-vm#configure-the-required-environment-variables
-
Restart the
chatwootservice.
sudo cwctl --restart
Verify login
- Add this instance to the target group attached to the alb.
- Navigate to your chatwoot domain to see if everything is working.
Create a custom AMI
- If you are getting the onboarding page, complete the signup and verify the installation.
- Voila !! Your chatwoot instance is up.
- If everything looks good, proceed to create an ami from this instance and name it
chatwoot-base-ami.
Auto Scaling Groups (ASG)
- Create a launch configuration using the above base image.
- Proceed to create an auto-scaling group from this launch config.
- Set the minimum and desired capacity to 2 and the maximum to 4. Modify this as per your requirement.
- Create a scaling policy based on CPU utilization.
- At this point, we are good to terminate the instance we created earlier.
- Check the load balancer or target group to verify if two new chatwoot instances have come up.
- That's it.
Monitoring
Updating Chatwoot
- log in to one of the application servers and complete the update instructions. Run migrations if needed. Refer to https://www.chatwoot.com/docs/self-hosted/deployment/linux-vm#upgrading-to-a-newer-version-of-chatwoot
- Create a new ami and update the launch config.
Conclusion
This document is a reference guideline for an HA chatwoot architecture on AWS. Modify or build upon this to suit your requirements.