By the end of this lesson, you will understand all the key things you can do on the Chatwoot dashboard.
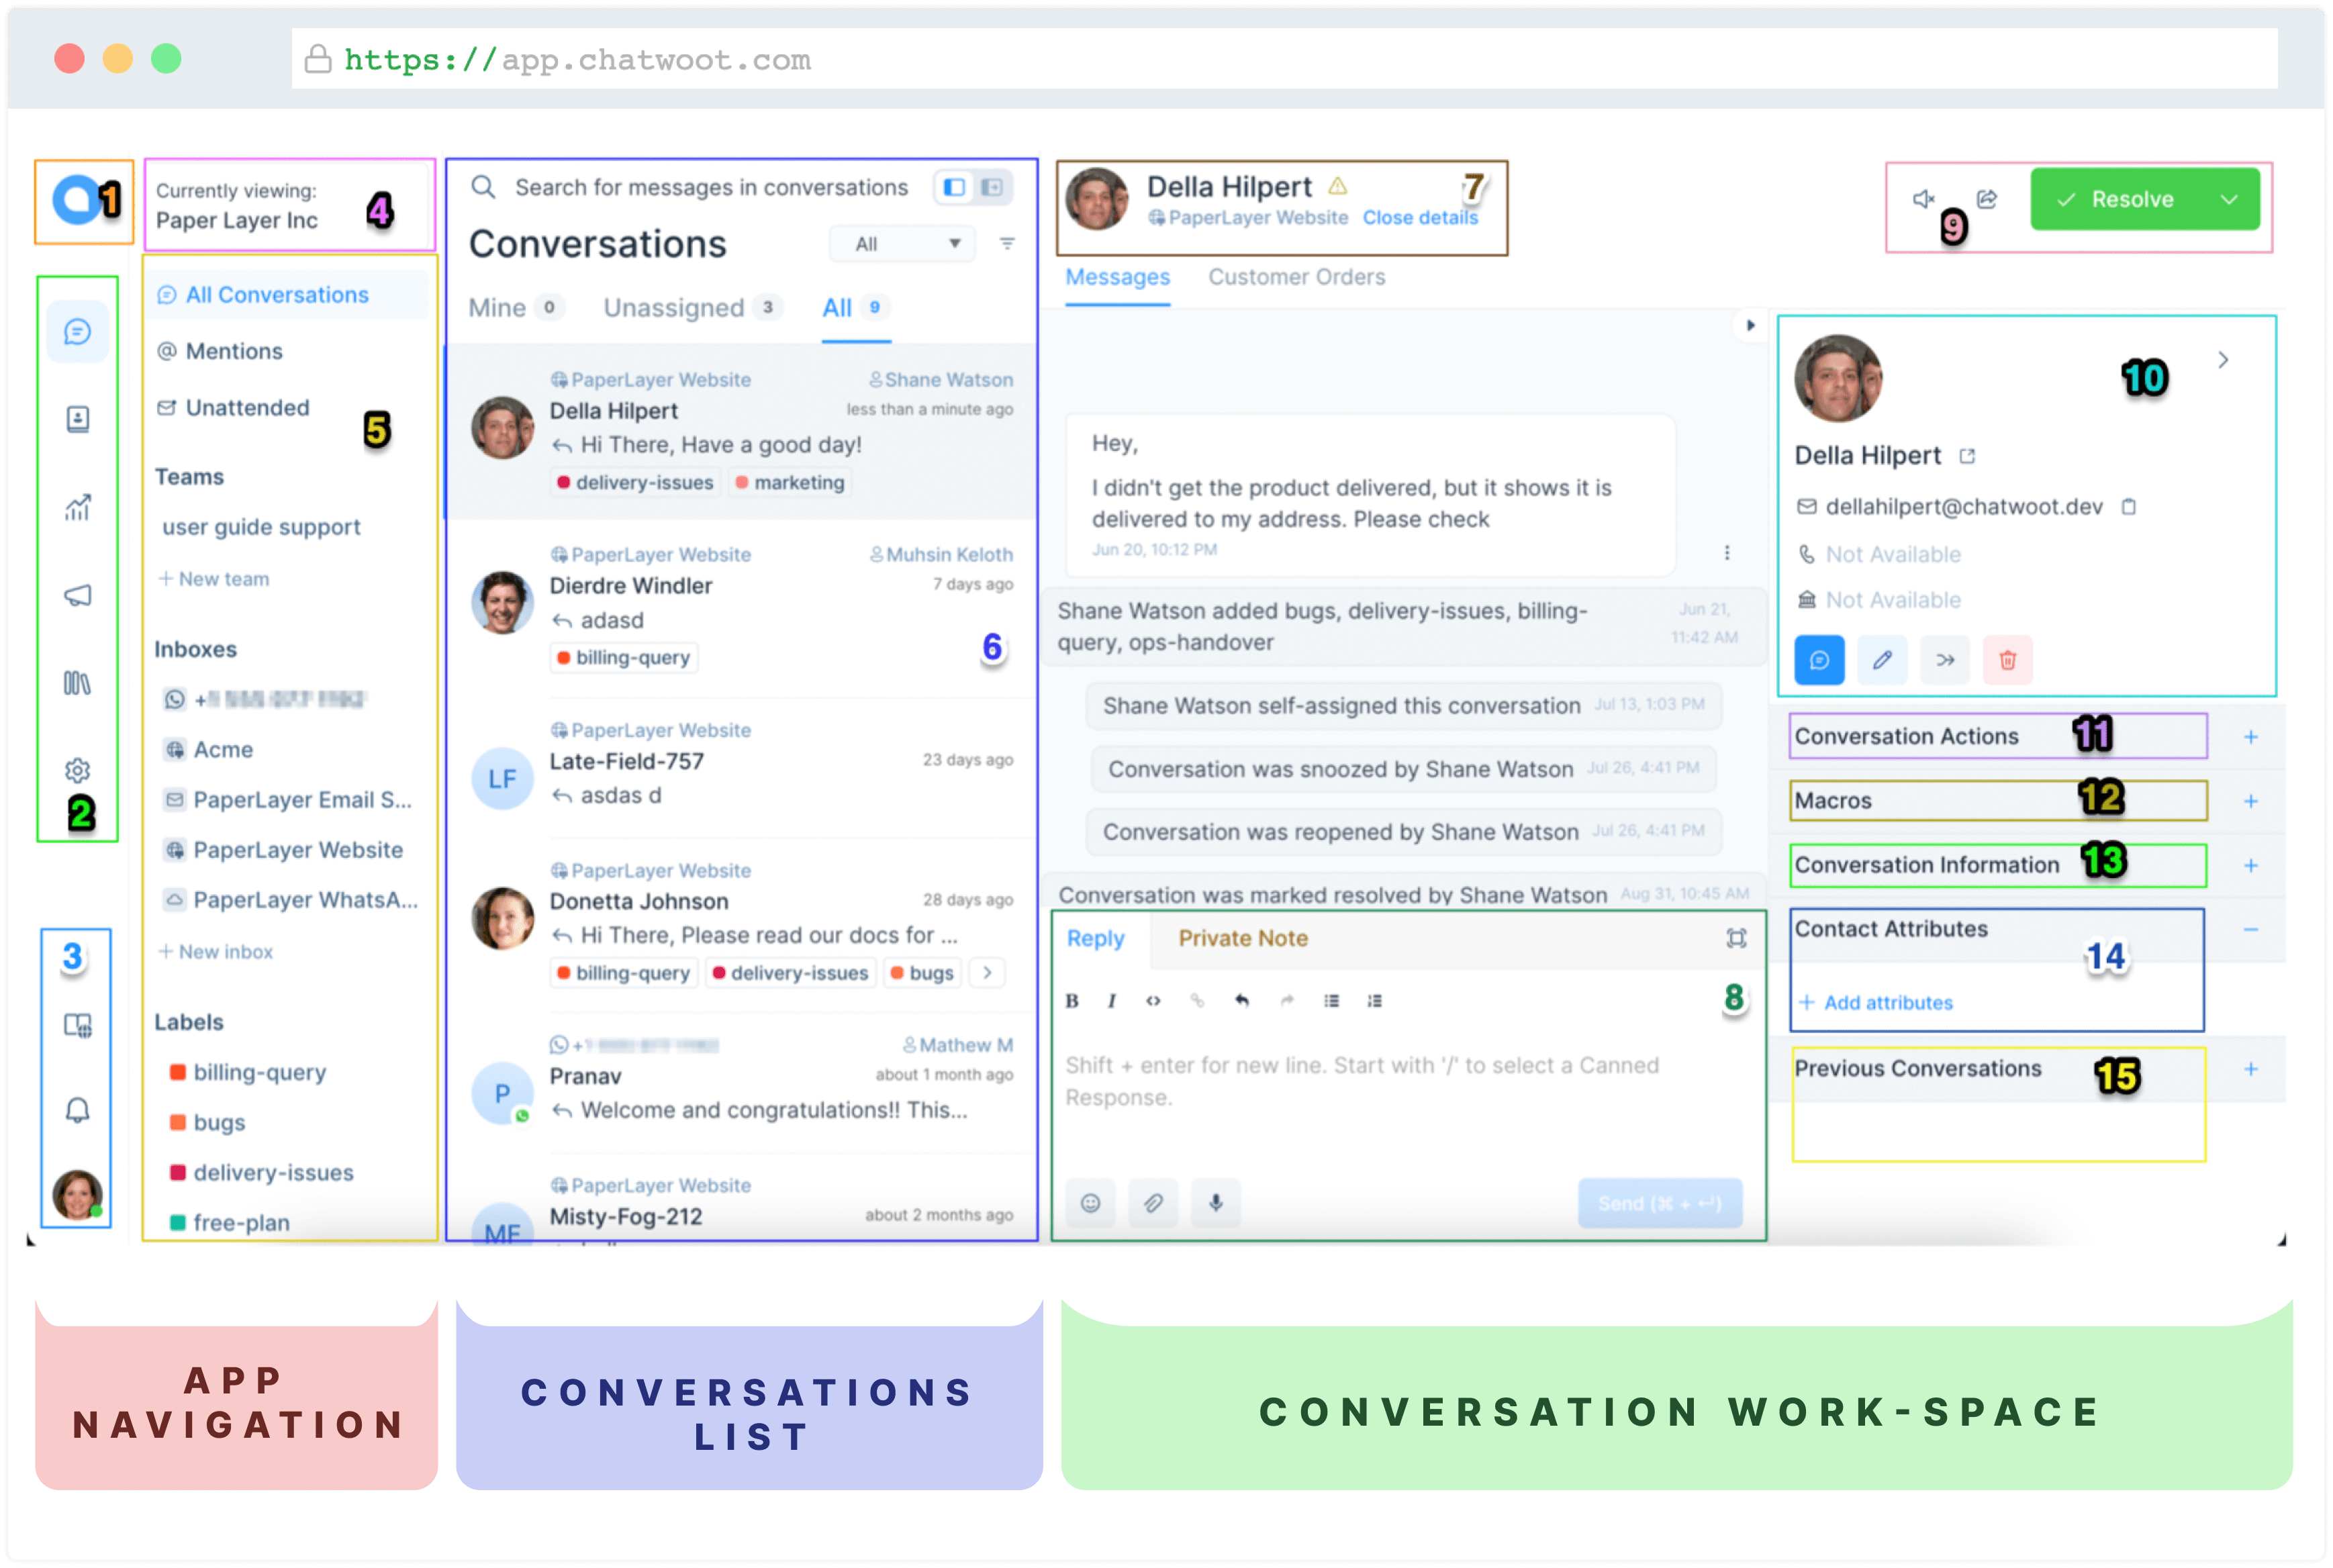
The screenshot given below represents your typical dashboard. It has been categorized by differently colored numbers for better distinction and understanding.

Let us pick each numbered section one-by-one and understand the anatomies of the dashboard.
1. Chatwoot icon
Click on the Chatwoot icon to go to the dashboard any time.
2. Sidebar controls
From top down:
Icon 1: View your conversations (people contacting/contacted you)
Icon 2: View contacts (people who have ever contacted you on Chatwoot + the ones you manually added)
Icon 3: View Reports (statistics about your conversations and everything related)
Icon 4: Create a campaign (for proactive customer reach outs)
Icon 5: Create a Help Center (or a Knowledge base, if you call it that)
Icon 6: Go to Account Settings
3. Sidebar controls – set two
From top down:
Icon 1: Read our docs to solve product-related queries
Icon 2: View notifications
Icon 3: Go to personal profile settings
4. Currently viewing
This shows the connected org./company for which you are receiving messages from customers. If you have two orgs./accounts connected with a single email ID, you can switch between your accounts from here.
5. Connected stuff
In this section, you can see all the connected inboxes and enabled features of Chatwoot. Let us understand them one-by-one.
Conversations
All Conversations: All the conversations your account has received.
Mentions: Conversations where your teammates have mentioned you.
Unattended: Conversations without a single reply.
Teams
The internal teams you have created for working collaboratively.
Inboxes
Inboxes are channels that you have connected to your Chatwoot account. You can click on any one inbox at any time to view only the conversations coming in from that inbox.
Labels
Your created labels for organizing your conversations.
6. Conversations
This will be your most-used part of the dashboard. Let us look at each part separately.
Search bar
Type in a keyword you remember from a conversation or the contact’s name to display a list of matching results.
Switch your dashboard layout
Choose how you want to view your Chatwoot dashboard. You can choose to hide your chat queue, giving more space to your chat window.
Filter conversations
Choose from various filters to only see the conversations you need to see.
List of conversations
This section enlists your conversations chronologically (newest/last received on top).
You can switch among the “Mine”, “Unassigned”, and “All” tabs to respectively view the conversations assigned to you, the conversations with no assigned agent taking care of it, or all of them.
Each conversation card shows the inbox/channel that conversation comes from, assigned agent, last sent message, time stamp, and associated labels.
7. Customer basic info
Name of the customer, followed by the channel they contacted you from.
8. Reply box
Type here to send a message to your customer. You can format rich text, insert emojis, attach files, or even record a voice note.
If you switch over to the Private Note tab, you can send private messages to your teammates and discuss customer queries before replying to the conversation.
You can also expand your text box by clicking on the icon on the top-right side of the Reply Box.
9. Conversation actions
Icons as seen from left to right:
Mute
Mute a conversation to stop receiving notifications for the same.
Send transcript
Send the full chat transcript to the customer, assigned agent or any other email address.
Resolve conversation
Use when you want to close a conversation; generally used when the associated concern of the customer has been rectified.
Other options from the dropdown:
Mark as pending
Using this option sends the conversation to the Pending chats list.
Snooze until
Snooze a conversation when you need to wait for a certain period or for a reply from the customer to take the conversation forward but cannot close it yet.
10. Contact details
A concise view of all the available info of the contact followed by these 4 options:
-
New message
-
Edit contact
-
Merge contact
-
Delete contact
You can also click on the icon next to the contact name to get an expanded view of the contact details and see any related contact notes.
11. Conversation Actions
Assigned Agent
Use this dropdown to view the list of agents in your account and select one to assign the conversation to them.
Assigned Team
Use this dropdown to view the list of internal teams in your account and select one to assign the conversation to them.
Conversation Labels
Click on “+Add Labels” to view the list of labels in your account and select the ones that fit.
12. Macros
Expand this section to view the list of the macros you setup for your account. A macro is a set of sequential saved actions, like labelling a conversation, sending an email transcript, sending an attachment, etc., which you can define from your Chatwoot Settings. When you select a Macro and run it, you can execute a sequence of pre-defined actions in one click.
13. Conversation Information
Expand this section to view the conversation “demographics”.
14. Contact Attributes
Expand this section to view and apply custom account attributes which can be defined from the Account Settings.
15. Previous Conversations
Expand this section to get a list of all the previous conversations associated with the contact.
Feeling confident about the dashboard? That probably took 5 minutes! Let us understand all the core features next. Go to Lesson 3A now.